Transferring Power Hip to Hip
By Susan Ellis, November 2006
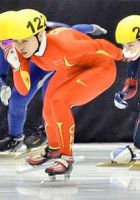
We have talked frequently about loading the ankle joint to deliver power through the ball of the foot. In order to do that the ankle joint must be closed and in the locked, tight, strong position from which to push. Likewise, the hip muscles must be in a locked, tight, strong position from which to push. We have many terms and ways to describe the position but each skater should come up with their own cue to feel it. It is a position where your lower belly is scrunched toward the thigh, and your cheek bones (butt cheeks) are pointing towards the ice (butt tuck). The upper chest is compact toward the lower thigh but not so low that it causes the butt to release (out butt). In this position you can feel a tightness around the outer hip and glute muscles and the muscles feel loaded and ready to work. This scrunched, compact, locked, loaded position also helps to prevent rotations which take power away from the push.
Exercise to feel loaded hip
Stand beside a chair/boards in a glide/recovery position. Bring your lower belly close to your upper thigh, ensure your cheek bones are pointed toward the ground/ice, and compact your chest toward your thigh. Feel the tightness in your outer hip and glute muscles. Now try to rotate your upper body. You will find it difficult in this position, but if you rise up even slightly, you will be able to rotate much easier. Even a slight rotation takes away valuable power from the hip. So, one key here is to scrunch to minimize rotations.
Delivering the power
The position you just did in the exercise above is called the set up position. This sets you up in the best possible position from which to start the delivery of power. Neglect the set up position and you will sacrifice power. Unfortunately, human nature often times has us power hungry individuals wanting to just skip ahead to the nitty gritty power part and we neglect to check the set up first. Having the patience to check your set up position each time will pay off in hordes of power in the end. In fact, patience in all aspects of the skating push is key to delivering full power.
So, you have the set up position and your weight is on your heel with your ankle open to start with. From here you will LOAD your push by accelerating your weight forward and to the side (all one motion, not forward, then side). You allow your ankle to close to the fully locked position, and wait to the push until your weight has reached the ball of the foot and your hips have moved ahead of your pushing skate.
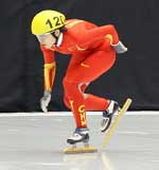
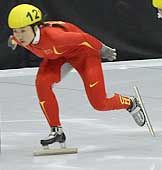
When you are first learning the LOAD, it is a good idea to leave your recovery leg (toe) on the ground/ice just to isolate the action of the loading leg. Once you have fully learned this movement you then need to bring in the action of the driving or thrusting leg. The proper timing is that just as your weight approaches the back part of the ball of the foot, your thrusting knee is just pulling up beside your pushing knee. At this point your pushing leg completes it extension while your driving thigh comes up and drives forward under your chest.
The drive of the recovery thigh back to the locked hip position is what allows us to absolutely and fully utilize the power from the pushing hip. It allows a more complete extension through the pushing hip. Plus, it takes the power from the pushing hip and transfers it to the other hip to set up the push again.
As you are pushing, your recovery thigh must drive straight through under your chest to the same position it started in on the pushing leg, AND IT MUST REMAIN THERE UNTIL YOUR SKATE LANDS on ice. Allowing the thigh or lower leg to drop toward the ice for landing means you will be opening up the hip angle and unlocking it. If the recovery leg drops prematurely to the ice before the push is completed you will also have unlocked the pushing hip and lost power from it. Keeping the thigh close to the chest in the locked hip position all the way through to set down not only allows the final snap through the pushing hip, but also ensures the hips have continued to drive forward all the way through to the completion of push.
It is very important to ensure the recovery thigh drives straight through under your chest and does not rotate outward at any point in the drive. Any outward rotation of the driving thigh translates to a loss in power from the pushing hip. Keep your thigh driving right under your shoulder pocket (that soft spot between the shoulder bone and sternum, right under your ear lobe) through the entire push. Also ensure there are no rotations of your foot at any time either inwards or outwards.
Exercise: Feel the difference…
Stand beside a chair in the glide recovery position with your lower belly close to your thigh, your cheek bones pointed towards the ground, and your chest fairly close to your thigh (remember, not so low that it creates out butt).
Now without changing any angles on your glide leg, lift your recovery thigh up as close to your chest as possible, hold it there, go through an entire push holding your chest/belly close to your thigh. How far did your extension carry you? What did you feel in terms of the final extension through the hip.
Now try the same thing, except this time only bring your thigh half way to your chest. See and feel the difference? In the first one, with your thigh all the way to your chest you were able to drive further than just bringing your thigh half way up.
So, in short, two keys to getting full power from your hips:
- Keep the scrunched position all the way from set up to completion of push on the pushing leg.
- Drive your recovery thigh as close as possible to your chest as you start your push and hold it there through to set down.


