Relay Racing – Part 2 – The Exchange, Training IdeasBy Susan Ellis, February 2011
|
Talent wins games, but teamwork and intelligence wins championships. ~ Michael Jordan |
Last month’s tip discussed the basics of relays including the role of each skater in a relay, rotations through the relay, relay rules and protocol. If you haven’t read Relay Racing – Part 1 – Skater Roles and Laps – January 2011 I suggest you do so now.
In relay racing, the relay push to the next skater can make or break your race result. Tags need to be well timed and efficient. Coming out on the track too slow or too fast, too wide or too narrow for your tag up can mean you lose a position or more in the race or lose ground on the other teams. Proper relaying is a skill that is often overlooked in practices, even when the training calls for relay exchanges. Coaches and skaters often just get the laps in without focusing on the skills that go into creating good exchanges. Don’t be lazy on your relay practices! Learn to do it properly so that YOU will be the one chosen for your team because of your good exchanges.
In relay racing, the relay push to the next skater can make or break your race result. Tags need to be well timed and efficient. Coming out on the track too slow or too fast, too wide or too narrow for your tag up can mean you lose a position or more in the race or lose ground on the other teams. Proper relaying is a skill that is often overlooked in practices, even when the training calls for relay exchanges. Coaches and skaters often just get the laps in without focusing on the skills that go into creating good exchanges. Don’t be lazy on your relay practices! Learn to do it properly so that YOU will be the one chosen for your team because of your good exchanges.
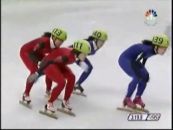 Click image to watch push technique video
Let’s look first at the role of the pusher. Your job is to make sure you skate a consistent corner without losing speed and place your exit according to the normal protocol of coming on to the track as explained in Part 1. You are in charge of instructing your teammate where you want them to come out on to the track. If they are coming out too soon, too narrow, etc, you need to communicate that to them so they come out better on the next exchange.
Your goal is to hit (and yes, I do mean HIT) your teammate as soon as your left leg comes through and touches the ice just after the last block. Both of you should be in the same sequence of step coming in to the relay and there should be no wait time until you hit your teammate, ie: gliding before contact.
Your goal is to hit (and yes, I do mean HIT) your teammate as soon as your left leg comes through and touches the ice just after the last block. Both of you should be in the same sequence of step coming in to the relay and there should be no wait time until you hit your teammate, ie: gliding before contact.
When you contact your teammate your feet should be a little more than shoulder width apart and they move apart during the first part of the push. Your elbows are close to your body when the contact is made and your chest close to the back of the receiver. A common mistake is making contact with the arms straight, then drawing the skater back in to your body and only then pushing the skater. This takes up valuable time. The contact should be hard and fast, in close to the body so the push is made right away with no wasted time. Compare the speed of exchange of the two lead teams to the third team in this video.
The contact point for your hands should be such that you are not pushing either down or up on your teammate but straight out. (Notice in this video the blue team push is slightly up because the finger tips contacted too low.)
The contact point for your hands should be such that you are not pushing either down or up on your teammate but straight out. (Notice in this video the blue team push is slightly up because the finger tips contacted too low.)
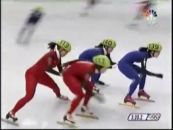 Click image to watch slo mo video
Just as your left leg is coming through to make contact with the ice you should be taking a deep breath in and contracting (tightening) the abdominal muscles. As you push straight out with both arms you are pushing down in to the ice through the abs and hips and exhaling. During the last part of the push your feet should be coming back in towards each other as you continue to exert pressure down in to the ice through the blades and pushing with your arms, hips and upper body in to the skater. You want to feel the push right through your arms, shoulders, back, abs, and hips. It is sooooo very frustrating to get a wimpy relay push! Make it a habit in practice to PUSH HARD every time and not just go through the motions.
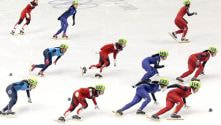
Now let’s look at what the push receiver does. The first thing you need to make sure of is that you get out on to the track at the time, in the right spot on the track (not too wide or too narrow), with the right amount of speed, and your feet and body are pointing in the right direction down the track. You also need to be aware of the protocol for coming out as discussed in Part 1 (1st place comes out closest to boards and 4th place comes out closest to blocks). So much to think about!!
|
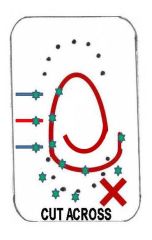
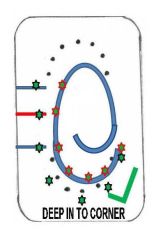
The first priority is getting yourself aligned with the pusher on the lap leading up to the push and adjusting your speed to match their speed. A good rule of thumb is to start aligning yourself right after the push (video) to the person who will be pushing you. Be careful though not to waste too much energy by going too deep in to the corners yet. Align yourself on the lap prior to the push (video) so that on the straightaway before the push you are even (or ever so slightly behind) the pusher at the first blue line, even at the red line, and even at the second blue line. You don’t need to go too deep in to the corner prior to the exchange but on the exchange corner it is critical to get yourself deep in to the corner to ensure you have both the speed and the correct trajectory coming out on to the track. A common error is to cut across the corner making you come out on to the track with too sharp a turn which kills your speed, and you also come out too far ahead of the pusher and have to wait for the push.
|
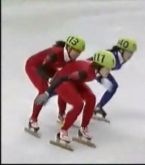
It is important to come out with your speed matching the speed of the pusher. Often skaters come out too slow. This makes it hard for the pusher to launch you with good speed and takes more time to get the push going.
Once you are on the track just ahead of the push you need to be in a low and stable position and ready to push again with your right skate as soon as you feel the pusher start to launch you.
Keeping your eyes up and being aware of where the other teams are is critical for both the pusher and the receiver. You don’t want to get launched right in to the butt of the skater ahead of you, so sometimes the pusher needs to take a bit off the push to ensure this doesn’t happen, and the receiver needs to look where you are going after the push to avoid traffic. Protocol says that after the push, the pusher should maintain a straight line down the track and move out of the way of following teams when traffic is clear. In this video, disaster was narrowly avoided when the pusher came back in front of the second team. Skaters should either glide straight (video) or move to the outside on the straight (video) to allow following teams to come through.
Now let’s look at some good exchanges and some not so good ones:
In this video the team in red/black passes to first on a very well timed exchange which allows them to pass the blue team. Notice red/black are on the same foot as they come in to the exchange, contact is made right after the last block, and the release is quick and hard. The blue team looked like they were on target for a good exchange but the skater on track exited too wide (a common mistake) causing a space to open up, thus the receiver had to wait for the push. The pusher then approached with outstretched arms rather than tight arms so the contact time on the blue team was too long.
In both these videos (video 1, video 2) we see how a late exchange causes the lead team to lose the gap they had built.
In this video the pusher on the team in second comes out of the corner too wide and then has to come back in to push allowing the red team to get a small gap.
The exchange zone is often a good place to pass, especially on teams that have poor exchanges or come out wide allowing lots of space to pass. In setting up a pass on the exchange the pusher must do a very good pass set up going in to the turn to be able to come inside the other team on the exit. The exchange takes place very slightly further down the straight and the receiver completes the pass. Watch in this video how the pusher in red takes a superb pass set up to build speed, and the receiver sets herself up on the track so she is already ahead of the blue team coming on to the track. Here is another example – 3rd place team in red passes 2nd team in brown/yellow.
It is as important to protect your position in a relay as it is in regular racing. The same racing rules apply in relays as in regular racing so cross tracking without contact is legal. Here is a good example of blocking the path after the exchange has taken place.
Often teams will choose who the workers are in a race and whose job it is to maintain status quo. The worker’s job might be to take their intervals out very hard to try to tire out a certain skater from the opposing team. Another skater’s role might be to conserve energy and not work hard if they don’t have to, not pass, but just maintain the position of the team until the end of the race so they have something left for the finish. It helps to watch what other teams are doing in practice to know what their order is so your team can plan a strategy based on the order of the opposing team. Be prepared for things to change once you hit the ice though. Anyone remember the ‘Cobra’ move of the Canadian men at 2010 Olympics where they changed their rotation in the middle of the race and finished with a different person than they normally do. This allowed the last person to go in to the final two laps more rested and they won the race with this strategy.
As discussed in Part 1 teams will generally put the strongest finisher last which normally means starting in position 2, the next fastest and fittest starts in position 1, the weakest skater typically goes 3rd, and the third strongest goes 4th. In setting up your strategy, your team also should consider size and weight, how effective each one's push is, their timing on exchanges, how well they can protect their track. If you have one skater on the team who is very fast and also fit you might have them do more work, while a weak link might do less work. In inexperienced teams it is often a good idea to minimize the number of exchanges by doing more work in each rotation; ie: 2L rotations instead of 1L.
Be prepared to change your number of laps or rotation once the race starts. Anything can happen, from missed exchanges, falls, seeing an opportunity to pass and forgoing a planned exchange to take advantage of the situation. You need someone on the team to be the captain who gives instructions to the rest of the team in the event the order gets out of sync. It is the captain’s job then to communicate changes to the team to either rework the number of laps in the rotation, or change the order, or leave it as is. For example, if a skater was supposed to do a 1.5 lap rotation but missed the exchange, you need to decide if the next skater comes out ½ lap late and only does 1 lap, or do they come out 1 lap late and only does ½ lap, or do they come out 1 lap late and do 1.5 and the next skater only does 1 lap. A coach on the side might be able to help with adjusting the rotations but often relays are very noisy and it is hard for every team member to hear a coach, so a team captain is essential.
Relay practices can be fun and challenging. They relieve the boredom of just doing straight laps all the time, while teaching athletes how to do proper relays. Relays are a good way to build endurance and/or speed.
Endurance relays:
3 x 15’ – 3 person x 3L
3 x 15’ – 4 person x 2L
Speed endurance relays:
4 x 6’ – 4 person x 1.5L
4 x 5’ – 6 person X 1L
Combination of endurance and speed:
3 x 10’ 4 person relay divided as follows:
3’ x 3L at 80%
2.5’ x 2L at 85%
2’ x 1.5L at 90%
1.5’ x 1L at 100%
1’ x ½ L at 100% (The 1/2L exchange is good for teaching to accelerate immediately after push and take 2 cross in to the corner.)
Speed endurance challenges:
Wacky Welays:
In this video the team in red/black passes to first on a very well timed exchange which allows them to pass the blue team. Notice red/black are on the same foot as they come in to the exchange, contact is made right after the last block, and the release is quick and hard. The blue team looked like they were on target for a good exchange but the skater on track exited too wide (a common mistake) causing a space to open up, thus the receiver had to wait for the push. The pusher then approached with outstretched arms rather than tight arms so the contact time on the blue team was too long.
In both these videos (video 1, video 2) we see how a late exchange causes the lead team to lose the gap they had built.
In this video the pusher on the team in second comes out of the corner too wide and then has to come back in to push allowing the red team to get a small gap.
The exchange zone is often a good place to pass, especially on teams that have poor exchanges or come out wide allowing lots of space to pass. In setting up a pass on the exchange the pusher must do a very good pass set up going in to the turn to be able to come inside the other team on the exit. The exchange takes place very slightly further down the straight and the receiver completes the pass. Watch in this video how the pusher in red takes a superb pass set up to build speed, and the receiver sets herself up on the track so she is already ahead of the blue team coming on to the track. Here is another example – 3rd place team in red passes 2nd team in brown/yellow.
It is as important to protect your position in a relay as it is in regular racing. The same racing rules apply in relays as in regular racing so cross tracking without contact is legal. Here is a good example of blocking the path after the exchange has taken place.
Often teams will choose who the workers are in a race and whose job it is to maintain status quo. The worker’s job might be to take their intervals out very hard to try to tire out a certain skater from the opposing team. Another skater’s role might be to conserve energy and not work hard if they don’t have to, not pass, but just maintain the position of the team until the end of the race so they have something left for the finish. It helps to watch what other teams are doing in practice to know what their order is so your team can plan a strategy based on the order of the opposing team. Be prepared for things to change once you hit the ice though. Anyone remember the ‘Cobra’ move of the Canadian men at 2010 Olympics where they changed their rotation in the middle of the race and finished with a different person than they normally do. This allowed the last person to go in to the final two laps more rested and they won the race with this strategy.
As discussed in Part 1 teams will generally put the strongest finisher last which normally means starting in position 2, the next fastest and fittest starts in position 1, the weakest skater typically goes 3rd, and the third strongest goes 4th. In setting up your strategy, your team also should consider size and weight, how effective each one's push is, their timing on exchanges, how well they can protect their track. If you have one skater on the team who is very fast and also fit you might have them do more work, while a weak link might do less work. In inexperienced teams it is often a good idea to minimize the number of exchanges by doing more work in each rotation; ie: 2L rotations instead of 1L.
Be prepared to change your number of laps or rotation once the race starts. Anything can happen, from missed exchanges, falls, seeing an opportunity to pass and forgoing a planned exchange to take advantage of the situation. You need someone on the team to be the captain who gives instructions to the rest of the team in the event the order gets out of sync. It is the captain’s job then to communicate changes to the team to either rework the number of laps in the rotation, or change the order, or leave it as is. For example, if a skater was supposed to do a 1.5 lap rotation but missed the exchange, you need to decide if the next skater comes out ½ lap late and only does 1 lap, or do they come out 1 lap late and only does ½ lap, or do they come out 1 lap late and do 1.5 and the next skater only does 1 lap. A coach on the side might be able to help with adjusting the rotations but often relays are very noisy and it is hard for every team member to hear a coach, so a team captain is essential.
Relay practices can be fun and challenging. They relieve the boredom of just doing straight laps all the time, while teaching athletes how to do proper relays. Relays are a good way to build endurance and/or speed.
Endurance relays:
3 x 15’ – 3 person x 3L
3 x 15’ – 4 person x 2L
Speed endurance relays:
4 x 6’ – 4 person x 1.5L
4 x 5’ – 6 person X 1L
Combination of endurance and speed:
3 x 10’ 4 person relay divided as follows:
3’ x 3L at 80%
2.5’ x 2L at 85%
2’ x 1.5L at 90%
1.5’ x 1L at 100%
1’ x ½ L at 100% (The 1/2L exchange is good for teaching to accelerate immediately after push and take 2 cross in to the corner.)
Speed endurance challenges:
- Teams should be evenly matched: 3 x 10’ 4 person relay X 1L – Team with most laps after 10’ wins
- Teams are uneven: Stronger team much catch weaker team within a certain number of laps.
Wacky Welays:
- Set up a very small track (bring blocks in from 111m track to a 50m track) and do sculling relays (skaters may only skull and not lift feet).
- Small track no skate, no skull relays (forces better push)
- Opposite way relays
- Backward relays – all skaters are going backwards. (Picture a relay in reverse motion.)
- 2 x 2 relays – 2 skaters are joined at the elbow and must stay joined and only unjoin at the last second to give push to the next pair who must receive the push joined at the elbow and stay joined until they give the push.
- Sandwich relays – this one is tricky. Do in 2 lap intervals – Skater 1 is on track, skater 2 comes on to track with skater 3 right behind. Skater 1 pushes skater 3 who immediately pushes skater 2. Skater 2 skates 2L. On exchange skater 3 comes on to track with skater 4 immediately behind. Skater 2 pushes skater 4 who immediately pushes skater 3. Carry on through entire rotation. Can add some excitement to endurance relays. Be careful of this one at higher speed.


