Ellis Edge: for Maximum Power and Speed on the Ice.
  • SCSSC Home
  • Ellis Edge Index
  • Home
  • Skating Tips
    • ⛸ TECHNICAL >
      • ⛸ CORNERS >
        • The Corner Lay In
        • Corners – Working the Right Hip on the Lay In
        • Bringing Right Hip Forward in Corner
        • Chest In to Corner
        • Moving Hips in the Corner
        • Moving Hips In to Push
        • Off Ice Training with Straps – Part 1 of a 2 Part Series
        • On Ice Training with Straps – Part 2 of a 2 Part Series
        • Bucket Drills
        • Partner Pull / Chair Push
        • The Corner Arm Swing
      • ⛸ POSITION >
        • Starting the Season Off Right
        • Taking Care of the Small Things
        • The 3 Keys Checklist – Find the Key in the Basics First!
        • Skating with Your Core
        • The Basic Position – The Arch
        • A Time to Get High, A Time to Get Low
        • Upper Body / Chest Position
        • Check Your Butt!
        • Butt Power
        • The Butt Tuck
        • Hip Dip
        • Bend the Ankle
      • ⛸ STARTS >
        • The Tip Over Toe Start
        • Start Technique
        • Start Position
      • ⛸ STRAIGHTAWAYS >
        • Press In to Push
        • Presscoopinchpushpinish
        • Gather the Power
        • Transferring Power from Ball of Foot to Ice – The Ankle Snap​
        • Transferring Power from Hip to Ball of Foot
        • Transferring Power Hip to Hip
        • Accelerating Your Weight In to Your Push
        • Japanese Four Eyes Technique
        • Delaying the Push – Straightaways
        • The Straightaway Shuffle
      • ⛸ TRACKS >
        • Tracks
        • Entry and Exit Width
        • Entry and Exit Trajectory
        • The Extra Crossover
        • Punching Through Centrifugal Force – Position and Alignments
        • Converting from 4 to 2 Strides on Straight
      • ⛸ ASSORTED TECHNICAL >
        • Relay Racing – Part 1 – Skater Roles and Laps
        • Relay Racing – Part 2 – The Exchange, Training Ideas
        • Skating with Your Core
        • Why Are The Koreans So Good?
        • Technical Opinions Can Be Confusing
        • The Outside Edge – Is It Overrated?
        • Diagonal Hill Steps
    • 🏃 TRAINING >
      • 🏃 PLANNING >
        • Off Season Rest and Recovery
        • Building Endurance
        • Summer Training
        • Train Fast to Skate Fast
        • Tapering
        • Time Trialing
      • 🏃 SPECIFIC >
        • Specificity in Training
        • Specific Skating Training – Is Your Plan Specific Enough?
        • Warm Ups and Warm Downs
        • Off Ice Balance, Agility, and Co-ordination Training
        • Dynamic Flexibility Training
        • Flexibility Training a Must for Speed Skaters
        • Maximize Your Results with TECHNI-CORDS
        • Improving Your Power with Jumps
        • ​Specific Strength, Power, Endurance – Part 1 – Straightaway
        • Specific Strength, Power, Endurance – Part 2 – Straightaway Jumps
        • Specific Strength, Power, Endurance – Part 3 – Corners
        • Specific Strength, Power, Endurance – Part 4 – Starts
        • Training for Starts
        • Relay Racing – Part 1 – Skater Roles and Laps
        • Relay Racing – Part 2 – The Exchange, Training Ideas
        • Bucket Drills
        • Partner Pull / Chair Push
        • Core Strength for Speed Skating
        • General Core Strength, by Brandon Aldan
      • 🏃 YOUTH >
        • Training Young Athletes 16 and Up
        • Training Young Athletes 12-15 Year Olds
        • Training Young Athletes Under 12
        • Youth Strength Training
    • 🏆 STRATEGY AND TACTICS >
      • Strategy and Tactics – Part 1 – Overview
      • Strategy and Tactics – Part 2 – Controlling the Pace and Track
      • Strategy and Tactics – Part 3 – The Moves and Counter Moves
      • Start Strategy
      • Time Trialing
      • The Slingshot Pass
      • The Outside Pass
      • The Inside Pass
      • Punching Through Centrifugal Force – Position and Alignments
      • Using Strategy and Tactics Under the New Rules
    • 🧠 PSYCHOLOGY >
      • How 5'5" Brandon Todd Learned to Dunk a Basketball
      • Strategy for Success
      • John Wooden on Success
      • What Do You Have to Brag About?
      • FOCUS!
      • IT – The Success Factor
      • To Try Is to Fail
      • It's All About Winning
      • How to Parent an Athlete: Lessons from a Swim Meet
      • Children in Athletics
      • Early Star vs Late Bloomer
      • Time Trialing
      • The Competition Plan
      • Start Technique
      • Post Season Evaluation
    • 🚑 SAFETY >
      • Concussions in Speed Skating
      • Safety! Is Your Child Truly Protected? – Part 1
      • Safety! Is Your Child Truly Protected? – Part 2
      • Dyneema Undersuits
    • 🚦 RULES >
      • Important Short Track Rule Changes for 2014-2015
      • Important Short Track Rule Changes for 2012
      • Using Strategy and Tactics under the New Rules
      • Important Short Track Rule Changes for 2010
    • 🧰 OTHER >
      • Ankle Pronation: Effects in Skating
      • Fair Play in Sports
      • Celebrating 100 Skating Tips of the Month!!
      • Sharpening Tips and Tricks
      • Cashing in on Olympimania to Promote Your Club
      • 75 Great Reasons to Train
      • Summer Games
      • Games
      • Masters Skating
      • Setting Up Blade Offset
  • Sue Ellis Bio
    • Testimonials
  • Contact
  • Camps

Partner Pull / Chair Push

By Susan Ellis, August 2003

Download printer-friendly format (pdf)
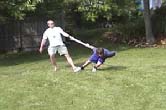
Partner Pull (Progression 30 from the Ellis Method for Corners)
Picture
Objective, Method, Technical Points and Feelings are the same as for the Chair Push below.

Instead of pushing a chair have a partner hold you by the right hand, lean and step. Your partner leans away from you and provides just enough resistance to allow you to go through the motions slowly, and steps with you each time you step. If you need more space between you and your partner, you can hold a beach towel between you instead of holding hands.

The left arm can either rest comfortably tucked on the back or use an abbreviated arm swing (see left arm swing under section on arms).
Picture
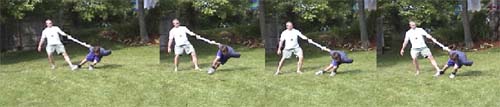
Variation: As you perfect this technique you can use turn cables with a partner for resistance. A turn cable is a long piece of thick rubber tubing with waist buckles for each person. This technique should be used only after you have perfected the movements on the chair or hand (towel) pull, as the cable can be difficult to control. Once perfected it is great for developing technique and strength.

​
Chair Push (Progression 29 from the Ellis Method for Corners)

Objective:
  • To simulate the entire movement of the crossover.
  • To feel maximum pressure in to the floor before the push.
  • To feel the lean on the crossover to the point of instability before pushing.
  • To feel the full extension of the legs on each push.
  • To simulate the rhythm and timing of the crossover while in motion.

Method:
  • Set up: Same as for Left Leg Knee Drop Static Load.
  • Start from a standing position with the feet about shoulder width apart and pointing straight ahead. The upper body should be bent at the waist so the back is in a low position, relaxed, with the back and shoulders slightly rounded and the butt tucked. Place your left hand on the back of the chair slightly ahead of you and lean the entire body towards it. Your right arm should be extended forward in a relaxed position with the upper arm close to the body and a slight bend at the elbow. The hand should not cross the centerline of the body.
  • Extend the right leg directly to the side and lift the heel about 1 inch off the ground with the ball of the foot still in contact. Keep the right foot in line with the left foot and pointing straight ahead.
  • The weight on the left foot is about mid-foot with the knee slightly in back of the toes. The knee should be bent to 90-100 degrees.
Picture
​Execution:
  • From the set-up position, bend the left ankle slowly forward as far as you can and feel the weight advance to the outside part of the ball of the foot. The left knee should drop forward to a position well ahead of the toes. As you reach the point of instability on the left leg, the right leg relaxes and the knee bends as it is pulled in from the side towards the left knee to a position where the back of the right knee is almost touching the front part of the left knee.
  • Next, the left leg extends fully, pushing the chair along the floor. Throughout this whole sequence the weight remains on the ball of the foot. At the same time, the right foot drops slightly ahead of, and to the inside of, the left foot and remains pointing straight ahead.
  • Now slowly bend the right ankle so that the right knee advances forward and down past the toes. Keep pressing the knee forward and down until you cannot bend the ankle any further and the angle is closed as much as possible. As you reach the point of instability on the right leg, the knee of the left leg bends and comes forward to a position where the left knee is to the inside of and slightly behind the right knee. The left knee should be lower than the right knee.
  • Keeping the pressure on the ball of the foot, extend the right leg so that the hip, knee and ankle are straight. As you extend the right leg the chair again slides along the floor. At the same time the left leg drives from its position behind the right leg to land slightly ahead of, and to the inside of, the right foot. Be sure not to overstep as this will throw your center of gravity backwards again!
  • Keep pushing the chair for 5-6 complete crossovers. Go through the movements slowly at first, and then gradually speed up the movements as you get better at performing the correct motions.

Technical Points:
  • On the landing of each foot, the weight should be under the mid portion of the foot and the knee should be bent to 90-100 degrees.
  • The left foot lands so that the left hip is to the left side of the foot. The right foot lands so that the left hip is to the inside of the right foot. Be sure not to overstep.
  • Both feet should be pointing straight ahead on landing and you land on the edge of your sneaker (not the flat).
  • Before each push the weight drops to the ball of the foot by bending the ankle forward.
  • The upper body should be low and relaxed, with the back and shoulders slightly rounded and the butt tucked. Your shoulders and hips must not rotate at any time. They remain perpendicular to the back of the chair.
  • Be sure there is no collapsing of the ankle to the inside. The ankle should only bend in a forward direction.
  • As you push the chair there must be no rising up of the hips. The hips remain at the same level they started throughout the entire movement.
  • The hip and knee extend fully to the straightened position and ankle extends with the pressure under the ball of the foot.
  • In both the start and finish positions on the left leg there should be a straight line from the left ankle to the left knee to the left hip to the left shoulder. Any break in the line means you may have rotated or twisted, or simply haven't leaned enough.
  • In both the start and finish positions on the right leg there should be a straight line from the right ankle to the right knee to the left hip to the left shoulder. Any break in the line means you may have rotated or twisted, or simply haven't leaned enough.
  • Wait until you are just about to the point of instability before starting each push and crossover.
  • The finish of the push with the one leg and the landing of the other foot should occur simultaneously.
  • Keep your head up. Looking at your feet will cause the hips to rise and the knees to drift back.
  • Make sure to use a strong, full, right arm swing.

Feelings associated with the movement:
  • The right ankle feels compressed, locked and strong when in the power position.
  • As you drop the knee forward and down you feel the entire body sink down and in toward the chair. (Be careful not to rotate the hip as you drop down. The hips must keep the same alignment as you drop down as they had in the up position).
  • When the knees are as far forward as possible you feel pressure under the ball of the foot.
  • As you speed up the movement and the ankle angle closes more rapidly you feel a nice light bouncy rhythm as you compress in to and explode out of the power position.
  • As you extend the legs you feel the extension of the hip muscles, a contraction of the quads, the snap of the knee to a straightened position, and a snap of the ankle to complete each extension.
  • Home
  • Skating Tips
    • ⛸ TECHNICAL >
      • ⛸ CORNERS >
        • The Corner Lay In
        • Corners – Working the Right Hip on the Lay In
        • Bringing Right Hip Forward in Corner
        • Chest In to Corner
        • Moving Hips in the Corner
        • Moving Hips In to Push
        • Off Ice Training with Straps – Part 1 of a 2 Part Series
        • On Ice Training with Straps – Part 2 of a 2 Part Series
        • Bucket Drills
        • Partner Pull / Chair Push
        • The Corner Arm Swing
      • ⛸ POSITION >
        • Starting the Season Off Right
        • Taking Care of the Small Things
        • The 3 Keys Checklist – Find the Key in the Basics First!
        • Skating with Your Core
        • The Basic Position – The Arch
        • A Time to Get High, A Time to Get Low
        • Upper Body / Chest Position
        • Check Your Butt!
        • Butt Power
        • The Butt Tuck
        • Hip Dip
        • Bend the Ankle
      • ⛸ STARTS >
        • The Tip Over Toe Start
        • Start Technique
        • Start Position
      • ⛸ STRAIGHTAWAYS >
        • Press In to Push
        • Presscoopinchpushpinish
        • Gather the Power
        • Transferring Power from Ball of Foot to Ice – The Ankle Snap​
        • Transferring Power from Hip to Ball of Foot
        • Transferring Power Hip to Hip
        • Accelerating Your Weight In to Your Push
        • Japanese Four Eyes Technique
        • Delaying the Push – Straightaways
        • The Straightaway Shuffle
      • ⛸ TRACKS >
        • Tracks
        • Entry and Exit Width
        • Entry and Exit Trajectory
        • The Extra Crossover
        • Punching Through Centrifugal Force – Position and Alignments
        • Converting from 4 to 2 Strides on Straight
      • ⛸ ASSORTED TECHNICAL >
        • Relay Racing – Part 1 – Skater Roles and Laps
        • Relay Racing – Part 2 – The Exchange, Training Ideas
        • Skating with Your Core
        • Why Are The Koreans So Good?
        • Technical Opinions Can Be Confusing
        • The Outside Edge – Is It Overrated?
        • Diagonal Hill Steps
    • 🏃 TRAINING >
      • 🏃 PLANNING >
        • Off Season Rest and Recovery
        • Building Endurance
        • Summer Training
        • Train Fast to Skate Fast
        • Tapering
        • Time Trialing
      • 🏃 SPECIFIC >
        • Specificity in Training
        • Specific Skating Training – Is Your Plan Specific Enough?
        • Warm Ups and Warm Downs
        • Off Ice Balance, Agility, and Co-ordination Training
        • Dynamic Flexibility Training
        • Flexibility Training a Must for Speed Skaters
        • Maximize Your Results with TECHNI-CORDS
        • Improving Your Power with Jumps
        • ​Specific Strength, Power, Endurance – Part 1 – Straightaway
        • Specific Strength, Power, Endurance – Part 2 – Straightaway Jumps
        • Specific Strength, Power, Endurance – Part 3 – Corners
        • Specific Strength, Power, Endurance – Part 4 – Starts
        • Training for Starts
        • Relay Racing – Part 1 – Skater Roles and Laps
        • Relay Racing – Part 2 – The Exchange, Training Ideas
        • Bucket Drills
        • Partner Pull / Chair Push
        • Core Strength for Speed Skating
        • General Core Strength, by Brandon Aldan
      • 🏃 YOUTH >
        • Training Young Athletes 16 and Up
        • Training Young Athletes 12-15 Year Olds
        • Training Young Athletes Under 12
        • Youth Strength Training
    • 🏆 STRATEGY AND TACTICS >
      • Strategy and Tactics – Part 1 – Overview
      • Strategy and Tactics – Part 2 – Controlling the Pace and Track
      • Strategy and Tactics – Part 3 – The Moves and Counter Moves
      • Start Strategy
      • Time Trialing
      • The Slingshot Pass
      • The Outside Pass
      • The Inside Pass
      • Punching Through Centrifugal Force – Position and Alignments
      • Using Strategy and Tactics Under the New Rules
    • 🧠 PSYCHOLOGY >
      • How 5'5" Brandon Todd Learned to Dunk a Basketball
      • Strategy for Success
      • John Wooden on Success
      • What Do You Have to Brag About?
      • FOCUS!
      • IT – The Success Factor
      • To Try Is to Fail
      • It's All About Winning
      • How to Parent an Athlete: Lessons from a Swim Meet
      • Children in Athletics
      • Early Star vs Late Bloomer
      • Time Trialing
      • The Competition Plan
      • Start Technique
      • Post Season Evaluation
    • 🚑 SAFETY >
      • Concussions in Speed Skating
      • Safety! Is Your Child Truly Protected? – Part 1
      • Safety! Is Your Child Truly Protected? – Part 2
      • Dyneema Undersuits
    • 🚦 RULES >
      • Important Short Track Rule Changes for 2014-2015
      • Important Short Track Rule Changes for 2012
      • Using Strategy and Tactics under the New Rules
      • Important Short Track Rule Changes for 2010
    • 🧰 OTHER >
      • Ankle Pronation: Effects in Skating
      • Fair Play in Sports
      • Celebrating 100 Skating Tips of the Month!!
      • Sharpening Tips and Tricks
      • Cashing in on Olympimania to Promote Your Club
      • 75 Great Reasons to Train
      • Summer Games
      • Games
      • Masters Skating
      • Setting Up Blade Offset
  • Sue Ellis Bio
    • Testimonials
  • Contact
  • Camps
Copyright © 2002 – Ellis Edge
Feel free to share or reprint this article but please give credit to the author.