The Basic Position – The ArchBy Susan Ellis, October 2009
Revised September 2011 |
I never hit a shot, not even in practice, without having a very sharp in-focus picture of it in my head. ~ Jack Nicklaus |
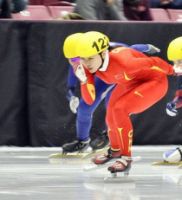
Many of you are just getting back on the ice after your summer vacation and you want to make sure you start the season off right by establishing a good basic position. Your basic position, as you know, is a huge factor not only in how much speed you can generate, but efficiency of skating as well, so you want to get it right! A lot of clubs and skaters make the mistake of grinding out tons of laps in the beginning of the season to build endurance. But if you grind out those laps and aren’t able to hold your position through the laps you will just end up creating bad habits for a poor position. Make sure that whatever number of laps you do grind out they are all done with perfect position. When you can no longer hold the perfect position, just stop for a second, give your muscles a break and then go again.
There are 3 keys to a good basic position:
In establishing the upper body position and butt tuck, think of the upper body and hips as an arch.
There are 3 keys to a good basic position:
- Upper body – The chest should be kept fairly close to the thighs with the sternum (breast bone) facing the ice, the lower part of the belly close to the upper part of the thigh but with a space in between so the belly is not resting completely on the thigh, the shoulders and upper back relaxed and rounded, and the lower back rounded to be able to keep your hips under you.
- Butt tucked – With the lower back rounded your hips will stay under you and your butt stays tucked in under you.
- Ankle bend – To allow your ankles to bend you will need to keep your chest down and your butt tucked under you.
In establishing the upper body position and butt tuck, think of the upper body and hips as an arch.
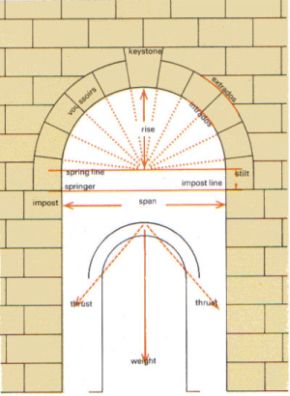
How an Arch "Works"
The central voussoir at the arch's apex (keystone) is traditionally the last to be set into position to "lock" the whole thing into a strong and stable structure. A keystone is not always necessary, however; there may be a joint at the apex instead, as is common in Gothic arches. Gravity tries to pull the keystone downwards, but the thrust is carried on either side by the voussoirs immediately flanking it. These in turn have their total thrust carried through the whole semicircle of pieces in a sideways direction until it reaches the vertical part of the wall and can descend directly to the foundation. In short, an arch works because vertical weight is deflected into sideways thrust and transferred to the walls.
http://www.robinsonlibrary.com/technology/building/details/arches.htm
Your abdominal wall is used in skating to form your arch to put more pressure down in to the ice. Read Skating with Your Core – September 2010,
Presscoopinchpushpinish – December 2009 and Gather the Power – April 2009.
Watch this video of Yoon Gy Kwak. See how he crunches up through his abdominal muscles to bring his shoulders rounding toward his hips, while his lower back rounds under him forming a strong arch with his upper body to transfer pressure in to the ice.
Speed skating is a game of inches, and I don’t mean just winning or losing by an inch at the finish line. I mean that if any one of the 3 keys is off by even an inch, you will be losing power, pressure in to the ice, and stability. I used to let skaters get away with a ‘pretty good’ position. But then I realized I was letting them get away with ‘almost good enough’. And ‘almost good enough’ gets you the 50.01 instead of the 49.90 that you really wanted. ‘Almost good enough’ gets you the 3rd position in the semi instead of the 2nd place it took to qualify for the final. And ‘almost good enough’ gets you the silver instead of the gold. My philosophy is that if you ain’t got your basic position, you ain’t got nothin’!
Every person is different so the basic position is different for different body types. A long upper body (torso) with short legs may need to round the back more to shorten the upper body lever to match the length of the thigh, otherwise they may have too much weight forward. A short torso might need to have a little flatter back to lengthen the upper body lever, otherwise they might find too much weight in back. A person with a stiff lower back might need to start with their hips a little further back or butt not tucked quite as much as we would normally like as a stiff lower back tends to raise the chest if they try to tuck the butt too much.
Speed skating, like any other sport, is constantly changing. One of the biggest changes I have made in how I ask skaters to establish their basic position is to start with the upper body instead of the ankles. (Although, because everyone is different there are a few who I still start with ankles first). The chest position in skating has changed a lot from skating with the sternum slightly up to having the sternum (for most) facing the ice. The challenge here is to still get the hips under and butt tucked. Start by folding over at the waist, keeping your knees and ankles straight. Check that your sternum is absolutely facing the ice. Now, keeping your sternum facing the ice, slowly push your knees forward past your toes and let your lower back round at the same time. Focusing on pushing your knees forward past your toes allows your ankles and knees to bend at the same time putting you in a perfect basic position. Don’t try to force your butt down during this. Simply pushing your knees forward brings your butt down automatically. Even today I still hear coaches telling skaters to start the basic position by bending the knees. Yes, knee bend is important, but if you bend from the knees first it’s really hard to bring your upper body and hips into position. And it puts a lot of strain on the quads.
A good way start each skating interval is to fold down in to position first, take a second to feel and relax in the position, and then start skating without coming up from the position. Coaches! You need to be adamant that everyone does this and does it correctly. It’s too easy to forget what sternum to the ice really feels like and if you always just start off high, usually the first thing that happens is people revert back to bending knees first leaving the upper body high. I have been known to let skaters get only a few meters starting off in poor positions before I blow the whistle and have them reset. Do this enough times and they will understand that almost good enough is just not good enough! Then you will start to see better results in terms of skaters taking care of basic positions first and because of that you will see results in better practices, and better racing.
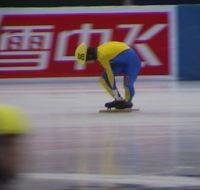 Monkey skating – sternum down, shoulders close to knees, lower back rounded with butt tucked under, ankle bend
Monkey skating is a good drill to help skaters feel a compact upper body to thigh, hips tucked under position. Just be careful that they do indeed have the hips and butt tucked under and are not just bending forward at the waist leaving the butt in the air. Have the skaters fold down in to position and then let their fingertips dangle at toe height. Check that the hips are under, butt tucked, and ankles bent. You can do a ton of laps in this position, building not only endurance, but also establishing the foundation for a great basic position. Constantly reinforce relaxation of the whole body, butt tucked, sternum down, belly close to thigh, knees moving forward in to push. I do most of my endurance laps in monkey skating now as it forces the skaters to constantly shift focus from ‘fatigue and pain’ to ‘position and relaxation’.
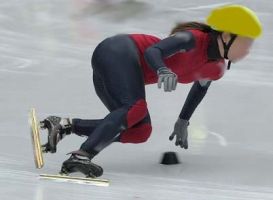
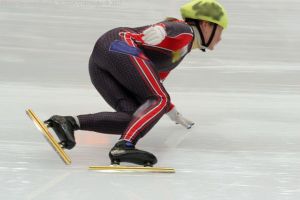
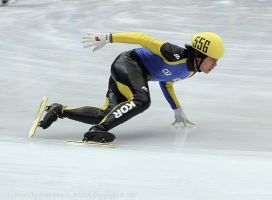
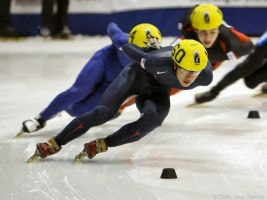
Compare these photos. You will clearly see the differences in good position and poor position:
Look at the skater in the lead. Note her compact belly to thigh, sternum down, hips under position. Now look at the other skaters. Note that in general the higher the chest, the less ankle bend there is. Skater in the 3rd position has no ankle bend because her butt is out.
Photos taken from Jerry Searches web pages . Some photos have been altered by this author for effect.


