On Ice Training with Straps – Part 2 of a 2 Part SeriesBy Susan Ellis, August 2009
|
The secret of success is constancy of purpose. ~ Benjamin Disraeli |
As we discussed last month (see Off Ice Training with Straps – July 2009) one of the keys to making technical improvements or changing bad habits is to slow things down to really FEEL what you need to feel. By adding resistance to slow training you are recruiting more muscle fiber and training them in the proper neural pathways to create the exact motion you want at higher speeds. By practicing these movements you want off ice first it’s easier to feel or change the things you need to on ice.
Off ice it’s fairly easy to slow things down using either Techni-Cords or straps. Techni-Cords are a proven method for both technical and strength and power training. (See Maximize Your Results with TECHNI-CORDS – June 2004 and Specific Strength, Power, Endurance – Part 3 – Corners – July 2006) You can also use straps off ice. Both of these devices work very well in helping to lay down initial motor pathways for your muscles and, when used on a regular basis, can really help in developing good technical habits.
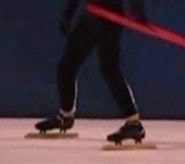
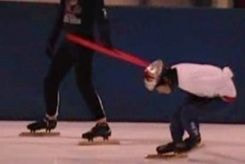
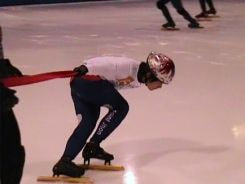
It’s a bit trickier to create resistance on ice. One method is to use buckets. (See Bucket Drills – December 2003) The bucket gives you something to lean on while creating resistance in to the ice to slow down movements. Another way is to use Techni-Cords or straps with a partner. Some athletes prefer to use Techni-Cords as the stretch in the cords allows them to move their hips better. Straps have no stretch so some athletes feel more control using them. The straps are basically 18 feet of 2 inch seat belt material sewn into a 9 foot loop. You can buy this stuff at a climbing store or order some off the web and make them yourself, or buy the straps already made up from some skate gear shops.
Watch the video
As always, with any technical exercise, precision in execution is critical. That precision again begins with the basic position. Here Chae has his hips tucked nicely under him, chest is down, belly close to thigh, back rounded and relaxed, no rotation of shoulders or hips, right knee forward past toes.
It is absolutely critical to maintain this position throughout the entire drill. One of the biggest tendencies is for the hips to rise up and out during the push phase. You must keep your lower back rounded so your hips stay under you to maintain pressure on the blade. If not you will find yourself tipping forward.
To start the drill, lean slowly to the left until all of your weight is supported on your left skate with the pressure under your blade in between back cup and mid-blade. Because you will not be extending your ankle in the drill your weight will only come forward to about mid-blade or slightly past (1). Make sure you lean by pressing in through your right hip and keep your shoulders and hips absolutely square and your hips under you. This will put pressure in to the ice and you should start to move forward in a wide circle because of the pressure.
Although the focus of this part of the drill is learn to create pressure through the entire push on the left skate, the push is actually governed by what happens on your right side. The goal here is to move your body as a whole unit away from your skate. To accomplish this you need to press in to the turn through your right side abdominals and right hip while lifting your right knee up high towards the left side of your chest. The action of lifting the right knee high over the left skate allows time for a full extension on the left skate.
Although the focus of this part of the drill is learn to create pressure through the entire push on the left skate, the push is actually governed by what happens on your right side. The goal here is to move your body as a whole unit away from your skate. To accomplish this you need to press in to the turn through your right side abdominals and right hip while lifting your right knee up high towards the left side of your chest. The action of lifting the right knee high over the left skate allows time for a full extension on the left skate.
|
As you do this your right shoulder should press down and follow your knee across to landing (ie: right shoulder over right knee).
|
You also want to feel that your left leg is working to create downward pressure in to the ice. You should feel the pressure under the blade from just in front of the back cup to a little in front of mid-blade (red). (2)
|
In the above photo sequence of the left push/ right cross:
Watch the video
Did you notice as well how slowly and precisely Chae makes every movement. This video is actual time, no slo mo here folks! That’s learning to FEEL!
In this right leg push sequence notice again that Chae’s body position doesn’t change. His right shoulder starts out pressing down over his left knee and finishes by pressing down over his left knee. His left knee raises high under his chest as he pushes and stays there through to finish of push. He presses hard in to the ice and moves his hips across during the push. His hips stay square to his direction of travel with no rotations of either hips or shoulders. He times his push so he is near the end of the push before his left skate lands.
- Chae NEVER changes position through the lift/cross/ push. His hips stay at the same height and under him. His chest stays down. His left knee stays in front of his toe during the cross over. (Some athletes cheat and pull the knee back to give room for the left to come over).
- His right knee crosses high up to his chest and stays there through to the end of the push.
- His right shoulder starts out over his left knee and then, as his right crosses over, his shoulder follows his right knee.
- His right hip and abs press in to move his body away from his skate. Notice too that his right hip comes slightly forward during the cross.
- His pressure under his blade starts just in back of mid-blade and comes forward to just in front of mid-blade during the push.
Watch the video
Did you notice as well how slowly and precisely Chae makes every movement. This video is actual time, no slo mo here folks! That’s learning to FEEL!
In this right leg push sequence notice again that Chae’s body position doesn’t change. His right shoulder starts out pressing down over his left knee and finishes by pressing down over his left knee. His left knee raises high under his chest as he pushes and stays there through to finish of push. He presses hard in to the ice and moves his hips across during the push. His hips stay square to his direction of travel with no rotations of either hips or shoulders. He times his push so he is near the end of the push before his left skate lands.
Watch the video
Now is a great time of year to really make technical changes and gains for those of you who have ice. This drill is will not only help your technique but it is also one heck of a good strength exercise!
Now is a great time of year to really make technical changes and gains for those of you who have ice. This drill is will not only help your technique but it is also one heck of a good strength exercise!
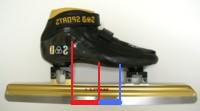
- Some coaches have skaters intentionally try to push from the heel at all times. While this technique is efficient and works well at lower speeds it does not work well for higher speeds. At higher speeds, although the pressure in the push starts just in front of the back cup it should finish just in back of the ball of the foot to be able to fully use the ankle joint.
- If you were doing a higher speed drill you would want to let your pressure come further forward towards the very end of the push to complete the action through the ankle on the left skate. (blue) On the right skate your weight stays more in back of mid-blade to complete the push.
Thank You to Chae Young Lim to the Saint John club for this great technical video

